环境
- windows 10 64bit
- torch 1.7.1+cu101
视频看这里
Bilibili
前言
近日,原 YOLOv3/YOLOv4/Scaled-YOLOv4 的团队推出了 YOLOv7,源码地址:https://github.com/WongKinYiu/yolov7,同样是基于 pytorch 框架,对应的论文地址:YOLOv7: Trainable bag-of-freebies sets new state-of-the-art for real-time object detectors,感兴趣的童鞋可以去读一读。
据官方的介绍,YOLOv7 是当前实时目标检测算法的 State Of The Art 也就是 SOTA,来看看下面的这张横向比较图
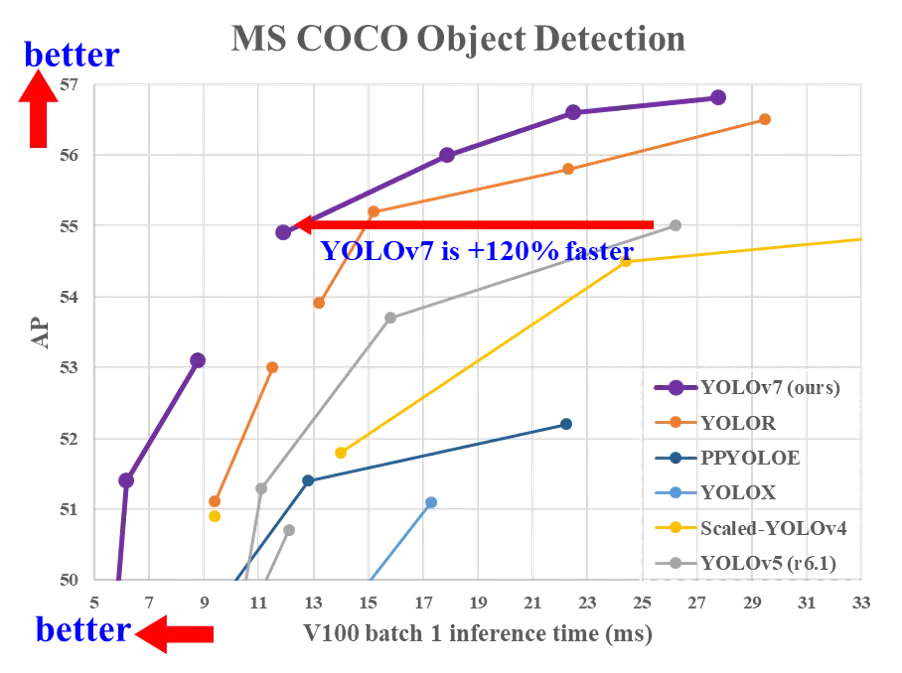
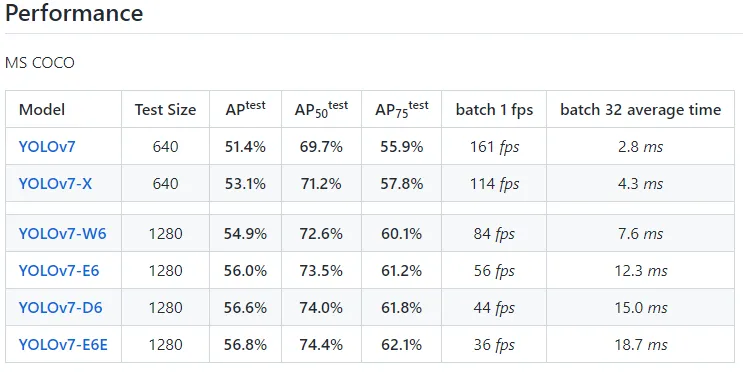
性能方面,各模型也是有不同程度的提升,看看其在 MS COCO 上的表现
代码实操
基础环境,包括 nvidia 驱动安装、python、cuda、cudnn、pytorch 等这些内容就不再讲了,不清楚的朋友,可以参考
首先,我们下载官方源码
git clone https://github.com/WongKinYiu/yolov7.git
cd yolov7
然后安装依赖
# 如果前面安装了pytorch,这里就将requirements.txt中的pytorch注释掉
pip install -r requirements.txt
依赖安装结束后,可以执行
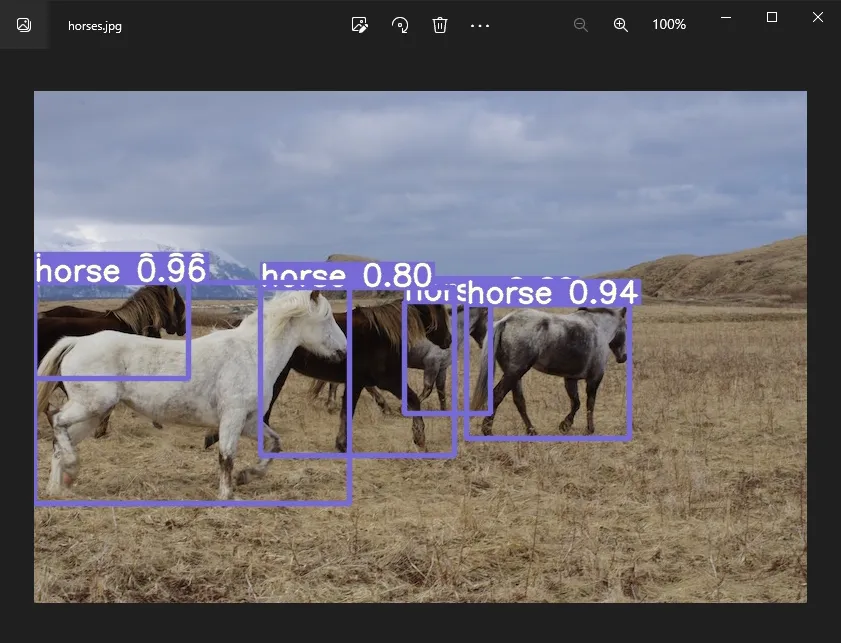
python detect.py代码执行过程中会去下载模型文件 yolov7.pt,下载成功后,会去检测 inference/images 目录中的图片,这里只有一张图片

结束后,检测结果为
当然也可以指定数据源,带上参数 --source
python detect.py --source bus.jpg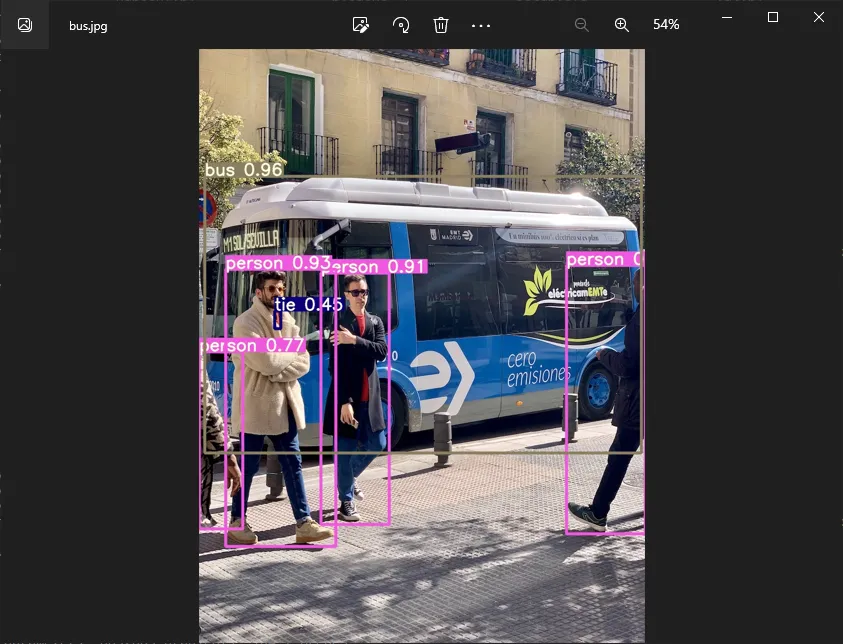
如果是视频文件检测,--source 参数后面直接跟上视频文件,摄像头检测的话,--source 参数后面跟上摄像头的 id,如 0、1 …;网络流媒体的话,也是支持 http、rtsp 和 rtmp 等协议
YOLOv7 除了实现目标检测,它还会带来人体关键点检测和实例分割这2个重要功能
目前人体关键点检测功能基本完成,我们来看看示例,在 tools/keypoint.ipynb,在 notebook 中可以直接运行。
如果需要将 ipynb 文件转成 python 文件,就执行
jupyter nbconvert --to python tools/keypoint.ipynb
将生成的 tools/keypoint.py 拷贝到源码根目录下,然后修改文件的最后部分
output = non_max_suppression_kpt(output, 0.25, 0.65, nc=model.yaml['nc'], nkpt=model.yaml['nkpt'], kpt_label=True)
output = output_to_keypoint(output)
nimg = image[0].permute(1, 2, 0) * 255
nimg = nimg.cpu().numpy().astype(np.uint8)
nimg = cv2.cvtColor(nimg, cv2.COLOR_RGB2BGR)
for idx in range(output.shape[0]):
    plot_skeleton_kpts(nimg, output[idx, 7:].T, 3)

# 将结果保存下来
cv2.imwrite('person_keypoint.jpg', nimg)
# In[5]:

#get_ipython().run_line_magic('matplotlib', 'inline')
#plt.figure(figsize=(8,8))
#plt.axis('off')
#plt.imshow(nimg)
#plt.show()然后去下载模型文件,https://github.com/WongKinYiu/yolov7/releases/download/v0.1/yolov7-w6-pose.pt,同样放在源码根目录下,准备一张测试图片,最后,执行
python keypoint.py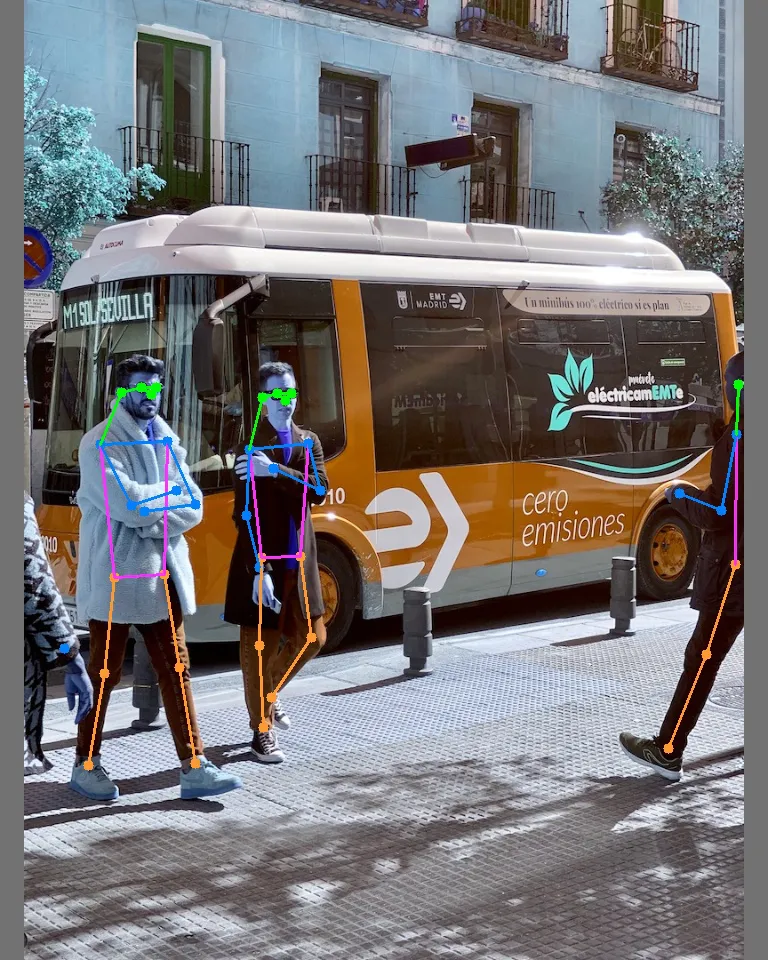
至于视频文件或者摄像头的情况,这里稍微修改一下代码
import torch
import cv2
import numpy as np
import time

from torchvision import transforms
from utils.datasets import letterbox
from utils.general import non_max_suppression_kpt
from utils.plots import output_to_keypoint, plot_skeleton_kpts

device = torch.device("cuda:0" if torch.cuda.is_available() else "cpu")
weigths = torch.load('yolov7-w6-pose.pt')
model = weigths['model']
model = model.half().to(device)
_ = model.eval()

cap = cv2.VideoCapture('gym_test.mp4')
if (cap.isOpened() == False):
    print('open failed.')

# 分辨率
frame_width = int(cap.get(3))
frame_height = int(cap.get(4))

# 图片缩放
vid_write_image = letterbox(cap.read()[1], (frame_width), stride=64, auto=True)[0]
resize_height, resize_width = vid_write_image.shape[:2]

# 保存结果视频
out = cv2.VideoWriter("result_keypoint.mp4",
                      cv2.VideoWriter_fourcc(*'mp4v'), 30,
                      (resize_width, resize_height))

frame_count = 0
total_fps = 0

while(cap.isOpened):
    ret, frame = cap.read()
    if ret:
        orig_image = frame
        image = cv2.cvtColor(orig_image, cv2.COLOR_BGR2RGB)
        image = letterbox(image, (frame_width), stride=64, auto=True)[0]
        image_ = image.copy()
        image = transforms.ToTensor()(image)
        image = torch.tensor(np.array([image.numpy()]))
        image = image.to(device)
        image = image.half()

        start_time = time.time()
        with torch.no_grad():
            output, _ = model(image)
        end_time = time.time()

        # 计算fps
        fps = 1 / (end_time - start_time)
        total_fps += fps
        frame_count += 1

        output = non_max_suppression_kpt(output, 0.25, 0.65, nc=model.yaml['nc'], nkpt=model.yaml['nkpt'], kpt_label=True)
        output = output_to_keypoint(output)
        nimg = image[0].permute(1, 2, 0) * 255
        nimg = nimg.cpu().numpy().astype(np.uint8)
        nimg = cv2.cvtColor(nimg, cv2.COLOR_RGB2BGR)
        for idx in range(output.shape[0]):
            plot_skeleton_kpts(nimg, output[idx, 7:].T, 3)

        # 显示fps
        cv2.putText(nimg, f"{fps:.3f} FPS", (15, 30), cv2.FONT_HERSHEY_SIMPLEX,
                    1, (0, 255, 0), 2)

        # 显示结果并保存
        cv2.imshow('image', nimg)
        out.write(nimg)

        # 按q退出
        if cv2.waitKey(1) & 0xFF == ord('q'):
            break
    else:
        break

# 资源释放
cap.release()
cv2.destroyAllWindows()

# 计算平均fps
avg_fps = total_fps / frame_count
print(f"Average FPS: {avg_fps:.3f}")
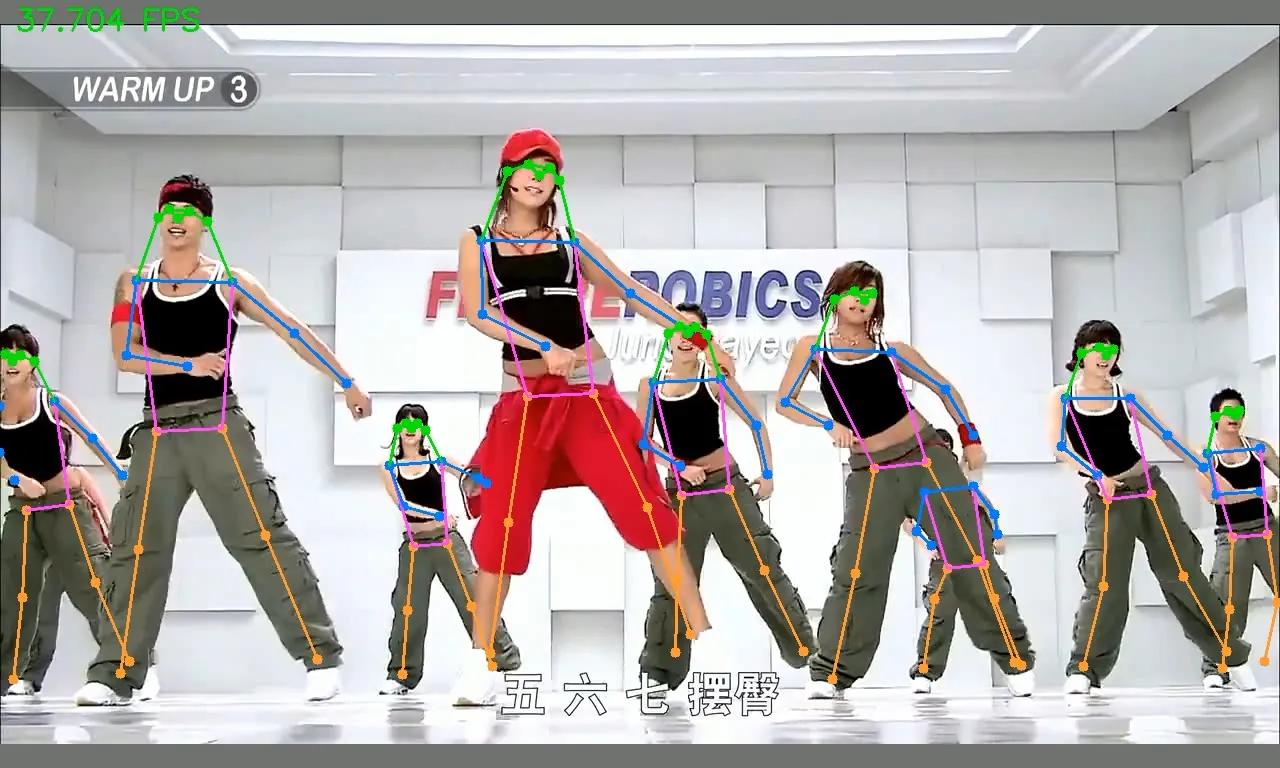
可以看到,在我的 1070Ti 显卡上,fps 是 37 左右,执行速度还是非常不错的
如果执行过程中报错

就需要去修改下 utils/plots.py,将
.cpu().numpy()修改为
.cpu().detach().numpy()如下图所示

这是因为 Tensor 变量带有梯度,如果直接转换为 numpy 数据将会破坏计算图,这里不需要保留梯度信息,可以在变量转换之前调用 detach()
最后,实例分割的模型还没有放出,我们持续关注。