软硬件环境
- ubuntu 18.04 64bit
- GTX 1660
- opencv 4.1.2
视频看这里
简介
前文基于haar特征的人脸检测方法已经实现了最简单的人脸检测方法,但是在检出率、准确率和速度上,都没有办法在实际场合中进行应用。本文就介绍另一种方法,它也是基于OpenCV的,在dnn模块中。
opencv的源码编译,并使能CUDA加速,请参考我之前的文章,https://xugaoxiang.com/2019/12/17/opencv-cuda/,里面的步骤很详细。
源码解析
辅助性的代码比较多,大家主要看两点,第一是网络的初始化,第二是人脸数据的检测
#include <opencv2/dnn.hpp>
#include <opencv2/imgproc.hpp>
#include <opencv2/highgui.hpp>

#include <assert.h>

using namespace cv;
using namespace cv::dnn;

#include <iostream>
#include <cstdlib>
using namespace std;

const double inScaleFactor = 1.0;
const Scalar meanVal(104.0, 177.0, 123.0);

const char* about = "This sample uses Single-Shot Detector "
                    "(https://arxiv.org/abs/1512.02325) "
                    "with ResNet-10 architecture to detect faces on camera/video/image.\n"
                    "More information about the training is available here: "
                    "<OPENCV_SRC_DIR>/samples/dnn/face_detector/how_to_train_face_detector.txt\n"
                    ".caffemodel model's file is available here: "
                    "<OPENCV_SRC_DIR>/samples/dnn/face_detector/res10_300x300_ssd_iter_140000.caffemodel\n"
                    ".prototxt file is available here: "
                    "<OPENCV_SRC_DIR>/samples/dnn/face_detector/deploy.prototxt\n";

const char* params
    = "{ help           | false | print usage          }"
      "{ proto          | deploy.prototxt      | model configuration (deploy.prototxt) }"
      "{ model          | res10_300x300_ssd_iter_140000.caffemodel     | model weights (res10_300x300_ssd_iter_140000.caffemodel) }"
      "{ camera_device  | 0     | camera device number }"
      "{ video          |       | video or image for detection }"
      "{ min_confidence | 0.5   | min confidence       }";

int main(int argc, char** argv)
{
    CommandLineParser parser(argc, argv, params);

    if (parser.get<bool>("help"))
    {
        cout << about << endl;
        parser.printMessage();
        return 0;
    }

    String modelConfiguration = parser.get<string>("proto");
    String modelBinary = parser.get<string>("model");

    //! [Initialize network]
    dnn::Net net = readNetFromCaffe(modelConfiguration, modelBinary);
    // 若为tensorflow模型,则使用readNetFromTensorflow,需要用到.pbtxt格式的配置文件和.pb格式的模型文件
    // dnn::Net net = readNetFromTensorflow(modelBinary, modelConfiguration);
    //! [Initialize network]

    if (net.empty())
    {
        cerr << "Can't load network by using the following files: " << endl;
        cerr << "prototxt:   " << modelConfiguration << endl;
        cerr << "caffemodel: " << modelBinary << endl;
        cerr << "Models are available here:" << endl;
        cerr << "<OPENCV_SRC_DIR>/samples/dnn/face_detector" << endl;
        cerr << "or here:" << endl;
        cerr << "https://github.com/opencv/opencv/tree/master/samples/dnn/face_detector" << endl;
        exit(-1);
    }

    // 下面这两句非常重要
    net.setPreferableBackend(DNN_BACKEND_CUDA);
    net.setPreferableTarget(DNN_TARGET_CUDA);

    VideoCapture cap;
    if (parser.get<String>("video").empty())
    {
        int cameraDevice = parser.get<int>("camera_device");
        // 从摄像头或者网络中读取数据
        cap = VideoCapture(cameraDevice);
        if(!cap.isOpened())
        {
            cout << "Couldn't find camera: " << cameraDevice << endl;
            return -1;
        }
    }
    else
    {
        // 从视频文件中读取数据
        cap.open(parser.get<String>("video"));
        if(!cap.isOpened())
        {
            cout << "Couldn't open image or video: " << parser.get<String>("video") << endl;
            return -1;
        }
    }

    for(;;)
    {
        Mat image;
        cap >> image; // get a new frame from camera/video or read image

        if (image.empty())
        {
            waitKey();
            break;
        }

        cv::Mat image_result = image.clone();

        if (image.channels() == 4)
            cvtColor(image, image, COLOR_BGRA2BGR);

        //! [Prepare blob]
        //!  image: 3 channels
        Mat inputBlob = blobFromImage(image, inScaleFactor,
                                      Size(image.cols, image.rows), meanVal, false, false); //Convert Mat to batch of images
        //! [Prepare blob]

        //! [Set input blob]
        net.setInput(inputBlob, "data"); //set the network input
        //! [Set input blob]

        //! [Make forward pass]
        Mat detection = net.forward("detection_out"); //compute output
        //! [Make forward pass]

        vector<double> layersTimings;
        double freq = getTickFrequency() / 1000;
        double time = net.getPerfProfile(layersTimings) / freq;

        Mat detectionMat(detection.size[2], detection.size[3], CV_32F, detection.ptr<float>());

        ostringstream ss;
        ss << "FPS: " << 1000/time << " ; time: " << time << " ms";
        putText(image_result, ss.str(), Point(20,20), 0, 0.5, Scalar(0,0,255));

        // 置信度,默认值是0.5,提高该值可以过滤错误结果
        float confidenceThreshold = parser.get<float>("min_confidence");
        for(int i = 0; i < detectionMat.rows; i++)
        {
            float confidence = detectionMat.at<float>(i, 2);

            if(confidence > confidenceThreshold)
            {
                int xLeftBottom = static_cast<int>(detectionMat.at<float>(i, 3) * image.cols);
                int yLeftBottom = static_cast<int>(detectionMat.at<float>(i, 4) * image.rows);
                int xRightTop = static_cast<int>(detectionMat.at<float>(i, 5) * image.cols);
                int yRightTop = static_cast<int>(detectionMat.at<float>(i, 6) * image.rows);

                Rect object((int)xLeftBottom, (int)yLeftBottom,
                            (int)(xRightTop - xLeftBottom),
                            (int)(yRightTop - yLeftBottom));

                // 将人脸的位置在图片中框出来
                rectangle(image_result, object, Scalar(0, 255, 0));

                ss.str("");
                ss << confidence;
                String conf(ss.str());
                String label = "Face: " + conf;
                int baseLine = 0;
                Size labelSize = getTextSize(label, FONT_HERSHEY_SIMPLEX, 0.5, 1, &baseLine);
                //rectangle(image_result, Rect(Point(xLeftBottom, yLeftBottom - labelSize.height), Size(labelSize.width, labelSize.height + baseLine)), Scalar(255, 255, 255), CV_FILLED);

                // 根据模型检测出的置信度也标识出来
                rectangle(image_result, Rect(Point(xLeftBottom, yLeftBottom - labelSize.height), Size(labelSize.width, labelSize.height + baseLine)), Scalar(255, 255, 0), 1);
                putText(image_result, label, Point(xLeftBottom, yLeftBottom), FONT_HERSHEY_SIMPLEX, 0.5, Scalar(255,0,255));
            }
        }

        imshow("detections", image_result);
        if (waitKey(1) >= 0) break;
    }

    return 0;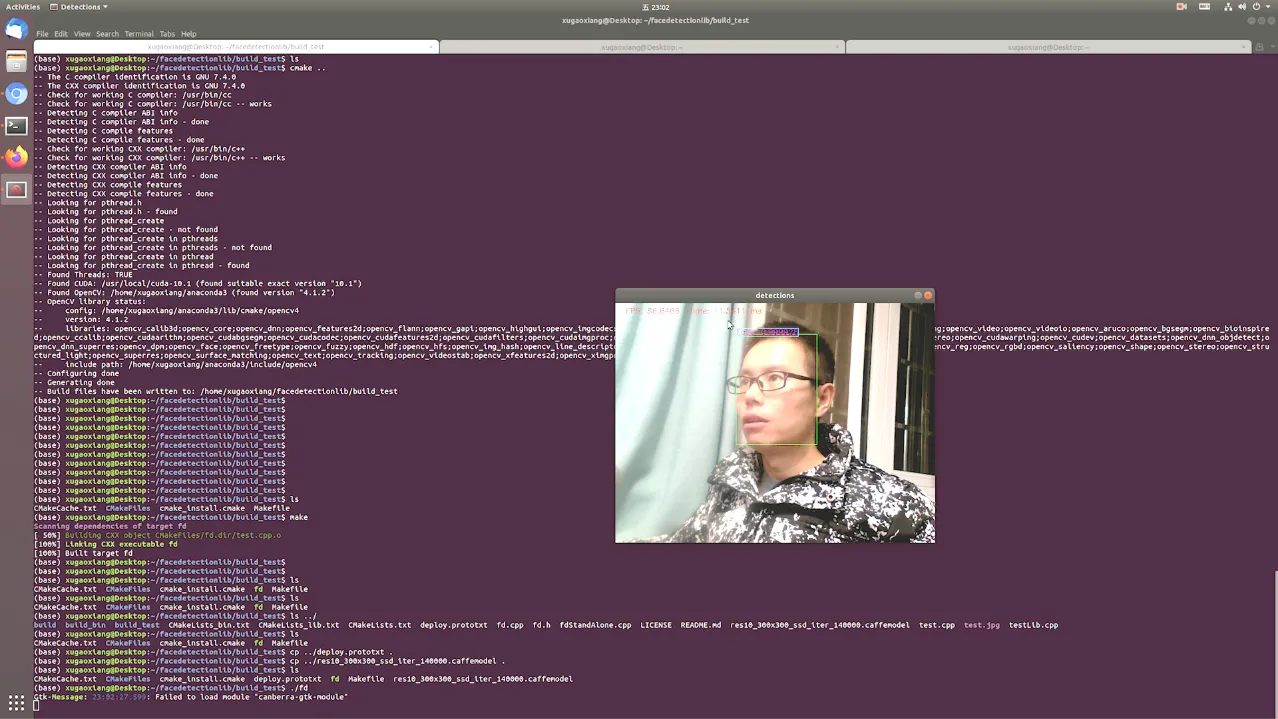
} // main大家在进行cmake编译的时候一定要注意看看输出信息,确保可以找到系统中已经编译好的opencv。编译成功后,运行可执行文件,同时注意看看系统资源的使用情况,特别是gpu的使用情况。
在GTX 1660的环境下,处理一帧数据大概耗时10毫秒左右,速度上还是不错的。另外,模型能够检测出大部分的侧脸数据,在这点上比其他的模型强上不少。
源码地址
源码已经上传到了github上了,地址是 https://github.com/xugaoxiang/FaceDetectionWithOpenCVDNN