软硬件环境
- ubuntu 18.04 64bit
- NVIDIA GTX 1070Ti 8G
- anaconda with python 3.6
- opencv 3.4.3
- cuda 9.0
- YOLO v3
前言
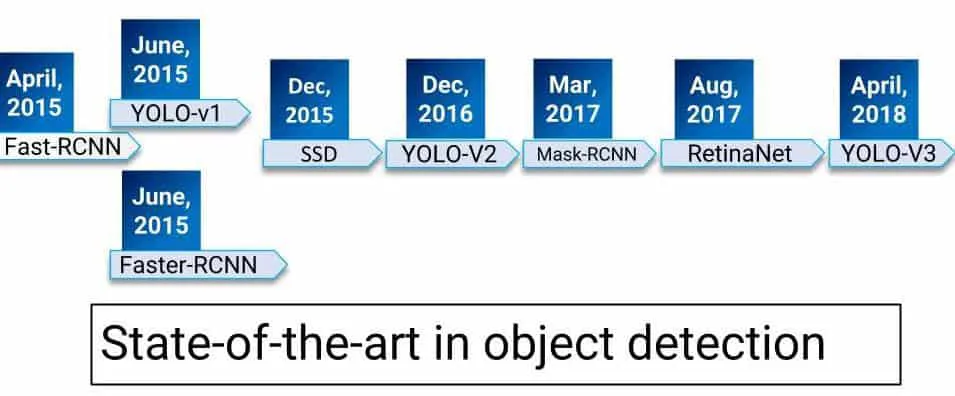
下图是近年来物体检测领域算法的演化,YOLO是目前公认的比较准确的物体检测算法,已经发展到了第三个版本。关于darknet(实现YOLO检测的开源项目)的基本情况,参考之前的博文 https://xugaoxiang.com/2019/12/16/darknet-basic/,里面有比较详细的阐述。
准备工作
下载YOLO检测需要用到的配置文件、weights模型文件及物体类型class文件
wget https://pjreddie.com/media/files/yolov3.weights
wget https://github.com/pjreddie/darknet/blob/master/cfg/yolov3.cfg?raw=true -O ./yolov3.cfg
wget https://github.com/pjreddie/darknet/blob/master/data/coco.names?raw=true -O ./coco.names
YOLO的基本原理
一般来讲,物体检测由两部分组成,物体定位(object locator)和物体识别(object recognizer)。下面以图片为例来讲YOLO的实现原理
- 将图片分割成
13x13大小的网格单元, 以一张416x416像素大小的图片为例,会有1024个网格单元,模型会在每个cell上预测bounding box - 每个
cell有可能会被预测出多个bounding box,大部分bounding box最后都会被清除,因为它们的相似度太低。这里有个算法叫Non-Maximum Suppression,翻译过来叫非极大值抑制,可参考论文Efficient-Non-Maximum-Suppression, NMS算法是用来提取相似度最高的
python代码
opencv 3.4.2及以上的版本已经支持darknet,同时也支持使用其他常见深度学习框架的模型,如torch、tensorflow、caffe等。
# -*- coding: utf-8 -*-
# @time : 18-10-26 下午4:47
# @author : xugaoxiang
# @email : xugx.ai@gmail.com
# @website : https://xugaoxiang.com
# @file : opencv_yolov3.py
# @software: PyCharm
# Usage example: python3 opencv_yolov3.py --image=test.png
import sys
import cv2
import argparse
import numpy as np
import os.path
# 参数初始化
# 相似度阈值
confThreshold = 0.5 # Confidence threshold
# NMS算法阈值
nmsThreshold = 0.4
# 输入图片的宽和高
inpWidth = 416
inpHeight = 416
parser = argparse.ArgumentParser(description = 'Object detection using YOLOv3 in opencv')
parser.add_argument('--image', help = 'Path to image file.')
args = parser.parse_args()
# 导入物体类别class文件,默认支持80种
classesFile = "coco.names"
classes = None
with open(classesFile, 'rt') as f :
classes = f.read().rstrip('\n').split('\n')
# yolo v3的配置及weights文件
modelConfiguration = "yolov3.cfg"
modelWeights = "yolov3.weights"
# opencv读取外部模型
net = cv2.dnn.readNetFromDarknet(modelConfiguration, modelWeights)
net.setPreferableBackend(cv2.dnn.DNN_BACKEND_OPENCV)
# 这里使用CPU,如果想使用GPU的话,参数是DNN_TARGET_OPENCL, 但是当前版本只支持interl GPU,如果是其它GPU的话,会自动切换到CPU模式
net.setPreferableTarget(cv2.dnn.DNN_TARGET_CPU)
# Get the names of the output layers
def getOutputsNames(net) :
# Get the names of all the layers in the network
layersNames = net.getLayerNames()
# Get the names of the output layers, i.e. the layers with unconnected outputs
return [layersNames[i[0] - 1] for i in net.getUnconnectedOutLayers()]
# 画bounding box
def drawPred(classId, conf, left, top, right, bottom) :
# Draw a bounding box.
cv2.rectangle(frame, (left, top), (right, bottom), (255, 178, 50), 3)
label = '%.2f' % conf
# Get the label for the class name and its confidence
if classes :
assert (classId < len(classes))
label = '%s:%s' % (classes[classId], label)
# Display the label at the top of the bounding box
labelSize, baseLine = cv2.getTextSize(label, cv2.FONT_HERSHEY_SIMPLEX, 0.5, 1)
top = max(top, labelSize[1])
cv2.rectangle(frame, (left, top - round(1.5 * labelSize[1])), (left + round(1.5 * labelSize[0]), top + baseLine),
(255, 255, 255), cv2.FILLED)
cv2.putText(frame, label, (left, top), cv2.FONT_HERSHEY_SIMPLEX, 0.75, (0, 0, 0), 1)
# 使用NMS算法,丢弃低相似度的bounding box
def postprocess(frame, outs) :
frameHeight = frame.shape[0]
frameWidth = frame.shape[1]
classIds = []
confidences = []
boxes = []
# Scan through all the bounding boxes output from the network and keep only the
# ones with high confidence scores. Assign the box's class label as the class with the highest score.
classIds = []
confidences = []
boxes = []
for out in outs :
for detection in out :
scores = detection[5 :]
classId = np.argmax(scores)
confidence = scores[classId]
if confidence > confThreshold :
center_x = int(detection[0] * frameWidth)
center_y = int(detection[1] * frameHeight)
width = int(detection[2] * frameWidth)
height = int(detection[3] * frameHeight)
left = int(center_x - width / 2)
top = int(center_y - height / 2)
classIds.append(classId)
confidences.append(float(confidence))
boxes.append([left, top, width, height])
# Perform non maximum suppression to eliminate redundant overlapping boxes with
# lower confidences.
indices = cv2.dnn.NMSBoxes(boxes, confidences, confThreshold, nmsThreshold)
for i in indices :
i = i[0]
box = boxes[i]
left = box[0]
top = box[1]
width = box[2]
height = box[3]
drawPred(classIds[i], confidences[i], left, top, left + width, top + height)
# Process inputs
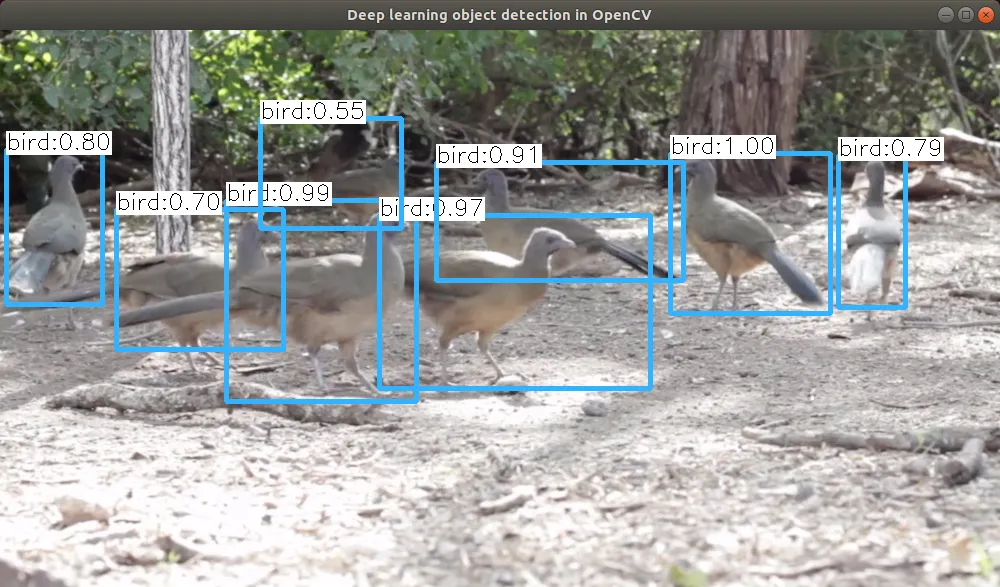
winName = 'Deep learning object detection in OpenCV'
cv2.namedWindow(winName, cv2.WINDOW_NORMAL)
if (args.image) :
if not os.path.isfile(args.image) :
print('Input image file {} does not exist.'.format(args.image))
sys.exit(1)
frame = cv2.imread(args.image, cv2.IMREAD_ANYCOLOR)
outputFile = args.image[:-4] + '_yolov3_out.png'
# Create a 4D blob from a frame.
blob = cv2.dnn.blobFromImage(frame, 1 / 255, (inpWidth, inpHeight), [0, 0, 0], 1, crop = False)
# Sets the input to the network
net.setInput(blob)
# Runs the forward pass to get output of the output layers
outs = net.forward(getOutputsNames(net))
# Remove the bounding boxes with low confidence
postprocess(frame, outs)
cv2.imshow(winName, frame)
cv2.imwrite(outputFile, frame)
cv2.destroyAllWindows()测试程序输出