环境
- ubuntu 18.04 64位
- yolov5
- deepsort
- fastreid
前言
前文 基于YOLOv5和DeepSort的目标跟踪 介绍过针对行人的检测与跟踪。本文介绍另一个项目,结合 FastReid 来实现行人的检测、跟踪和重识别。项目地址: https://github.com/zengwb-lx/Yolov5-Deepsort-Fastreid,作者给出的2个主要实例,也是非常的实用,包括行人流量的统计、人群中特定目标的查找与跟踪。
项目复现
首先,创建个全新的虚拟环境
conda create -n pytorch1.6 python=3.7
conda activate pytorch1.6
接着去拉取源码
git clone https://github.com/zengwb-lx/Yolov5-Deepsort-Fastreid.git
cd Yolov5-Deepsort-Fastreid
然后安装下其它的依赖包
# 如果没有gpu的话,就按照requirements.txt安装即可
pip install torch==1.6.0+cu101 torchvision==0.7.0+cu101 -f https://download.pytorch.org/whl/torch_stable.html

# 编辑requirements.txt,注释掉torch和torchvision
pip install -r requirements.txt

# 使用cython加速
pip install cython
cd fast_reid/fastreid/evaluation/rank_cylib
make all
cd ../../../../先来跑个行人计数的demo
python person_count.py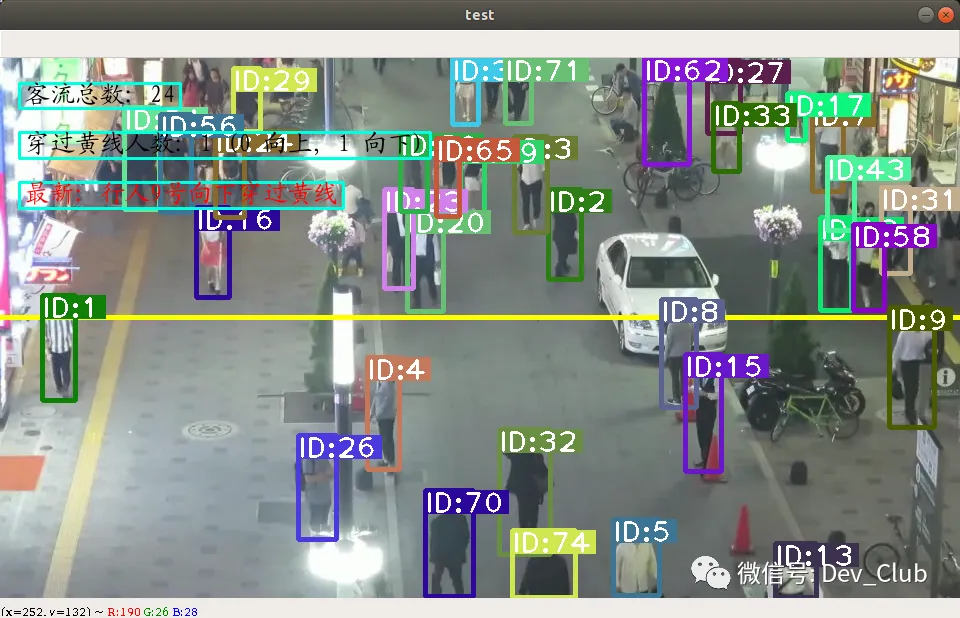
yolov5 的作者分别在 googleapi 和 github 上都保存了模型文件,但是这2个 yolov5s.pt 是不一样的,大家可以通过 md5sum 去查看一下,github 上的模型文件是对的
如果你在运行过程中出现下面的错误
2021-07-13 14:22:20 [INFO]: Loading weights from ./deep_sort/deep/checkpoint/ckpt.t7... Done!
Traceback (most recent call last):
  File "person_count.py", line 244, in <module>
    yolo_reid.deep_sort()
  File "person_count.py", line 121, in deep_sort
    bbox_xywh, cls_conf, cls_ids, xy = self.person_detect.detect(video_path, img, ori_img, vid_cap)
  File "/home/xugaoxiang/Works/Yolov5-Deepsort-Fastreid/person_detect_yolov5.py", line 95, in detect
    pred = self.model(img, augment=self.augment)[0]
  File "/home/xugaoxiang/anaconda3/envs/pytorch1.6/lib/python3.7/site-packages/torch/nn/modules/module.py", line 722, in _call_impl
    result = self.forward(*input, **kwargs)
  File "/home/xugaoxiang/Works/Yolov5-Deepsort-Fastreid/models/yolo.py", line 111, in forward
    return self.forward_once(x, profile)  # single-scale inference, train
  File "/home/xugaoxiang/Works/Yolov5-Deepsort-Fastreid/models/yolo.py", line 131, in forward_once
    x = m(x)  # run
  File "/home/xugaoxiang/anaconda3/envs/pytorch1.6/lib/python3.7/site-packages/torch/nn/modules/module.py", line 722, in _call_impl
    result = self.forward(*input, **kwargs)
  File "/home/xugaoxiang/Works/Yolov5-Deepsort-Fastreid/models/yolo.py", line 36, in forward
    self.training |= self.export
  File "/home/xugaoxiang/anaconda3/envs/pytorch1.6/lib/python3.7/site-packages/torch/nn/modules/module.py", line 772, in __getattr__
    type(self).__name__, name))
torch.nn.modules.module.ModuleAttributeError: 'Detect' object has no attribute 'export'
这个就是模型的问题,建议使用源码中自带的 shell 脚本进行下载
sh weights/download_weights.sh另外,依赖模块 apex,不可以通过 pip install apex 来安装,否则会报错
我们需要下载 apex 的源码,然后安装
git clone https://github.com/NVIDIA/apex.git
cd apex
pip install -v --disable-pip-version-check --no-cache-dir ./
如果安装的 pyyaml 版本较高的话,会出现下面的错误

只需要将 utils/parses.py 中的
self.update(yaml.load(fo.read()))改为
self.update(yaml.safe_load(fo.read()))我们来看看这个行人流量统计的基本原理:
首先,作者将 yolov5 的目标检测封装成了一个类 Person_detect,通过它的 detect 方法可以检测到视频中的每一个行人目标
然后,在画面中设定一条基准线,给定线条两端的坐标即可
line = [(0, int(0.48 * ori_img.shape[0])), (int(ori_img.shape[1]), int(0.48 * ori_img.shape[0]))]
cv2.line(ori_img, line[0], line[1], (0, 255, 255), 4)
接着,创建跟踪器,开始对 yolov5 检测出的每一个目标进行跟踪。这里以目标预测框的中心点为基准,下图是它的计算方法
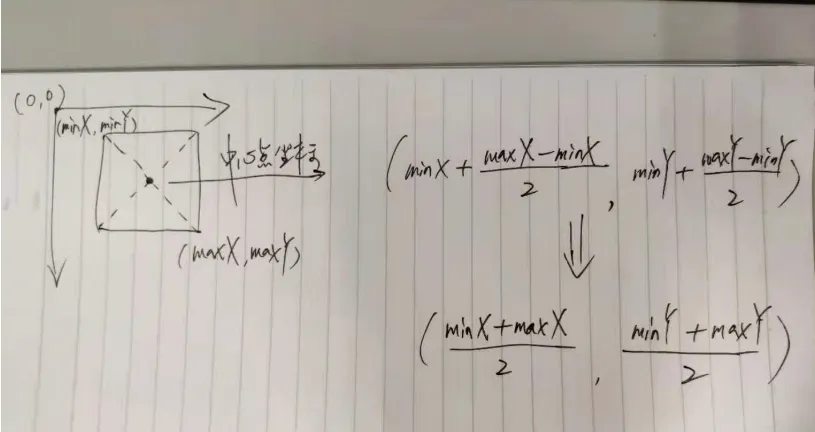
如果前后帧的中心点所连成的直线和预先设定的基准线相交,则判定为越线,但是这里还有个方向的问题,向上还是向下?来看另一张图
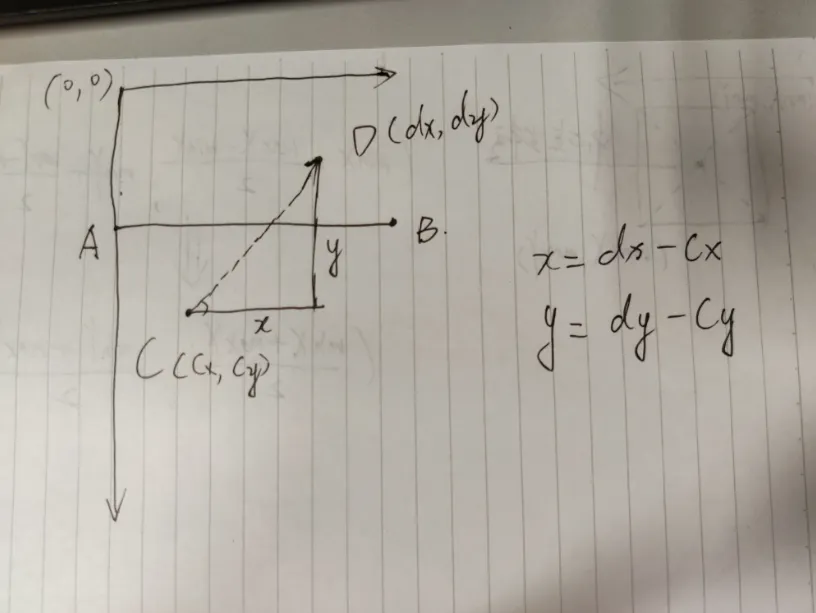
作者利用了三角形的正切与反正切原理,使用 math 模块中的 degrees 方法来判断,如果这个角度 >0,说明是向上走,反之则为向下走
def vector_angle(midpoint, previous_midpoint):
    x = midpoint[0] - previous_midpoint[0]
    y = midpoint[1] - previous_midpoint[1]
    return math.degrees(math.atan2(y, x))
看完行人计数的示例,我们再来看看特定目标的重识别示例
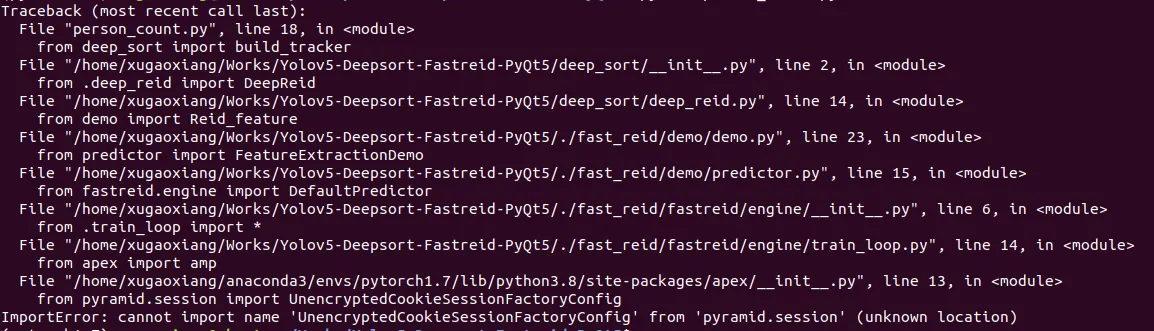
python person_search_reid.py报错了
Fusing layers...
Traceback (most recent call last):
  File "person_search_reid.py", line 120, in <module>
    yolo_reid = yolo_reid(cfg, args, path=args.video_path)
  File "person_search_reid.py", line 35, in __init__
    self.deepsort = build_tracker(cfg, args.sort, use_cuda=use_cuda)
  File "/home/xugaoxiang/Works/Yolov5-Deepsort-Fastreid/deep_sort/__init__.py", line 18, in build_tracker
    max_age=cfg.DEEPSORT.MAX_AGE, n_init=cfg.DEEPSORT.N_INIT, nn_budget=cfg.DEEPSORT.NN_BUDGET, use_cuda=use_cuda)
  File "/home/xugaoxiang/Works/Yolov5-Deepsort-Fastreid/deep_sort/deep_reid.py", line 29, in __init__
    self.extractor = Reid_feature()
  File "./fast_reid/demo/demo.py", line 84, in __init__
    cfg = setup_cfg(args)
  File "./fast_reid/demo/demo.py", line 35, in setup_cfg
    cfg.merge_from_file(args.config_file)
  File "./fast_reid/fastreid/config/config.py", line 107, in merge_from_file
    cfg_filename, allow_unsafe=allow_unsafe
  File "./fast_reid/fastreid/config/config.py", line 50, in load_yaml_with_base
    with PathManager.open(filename, "r") as f:
  File "./fast_reid/fastreid/utils/file_io.py", line 357, in open
    path, mode, buffering=buffering, **kwargs
  File "./fast_reid/fastreid/utils/file_io.py", line 251, in _open
    opener=opener,
FileNotFoundError: [Errno 2] No such file or directory: '../../kd-r34-r101_ibn/config-test.yaml'
这是缺少配置文件,到下面的链接去下载
链接: https://pan.baidu.com/s/1bMG3qy7npecCh6AzNO-Zyw
提取码: hy1m
把这2个文件都存放在目录 kd-r34-r101_ibn 下,然后修改源码 fast_reid/demo/demo.py 中的第45行,将
default='../../kd-r34-r101_ibn/config-test.yaml',改成
default='kd-r34-r101_ibn/config-test.yaml',将第68行的
default=['MODEL.WEIGHTS', '../../kd-r34-r101_ibn/model_final.pth'],改成
default=['MODEL.WEIGHTS', 'kd-r34-r101_ibn/model_final.pth'],然后再次运行脚本 person_search_reid.py,可以得到
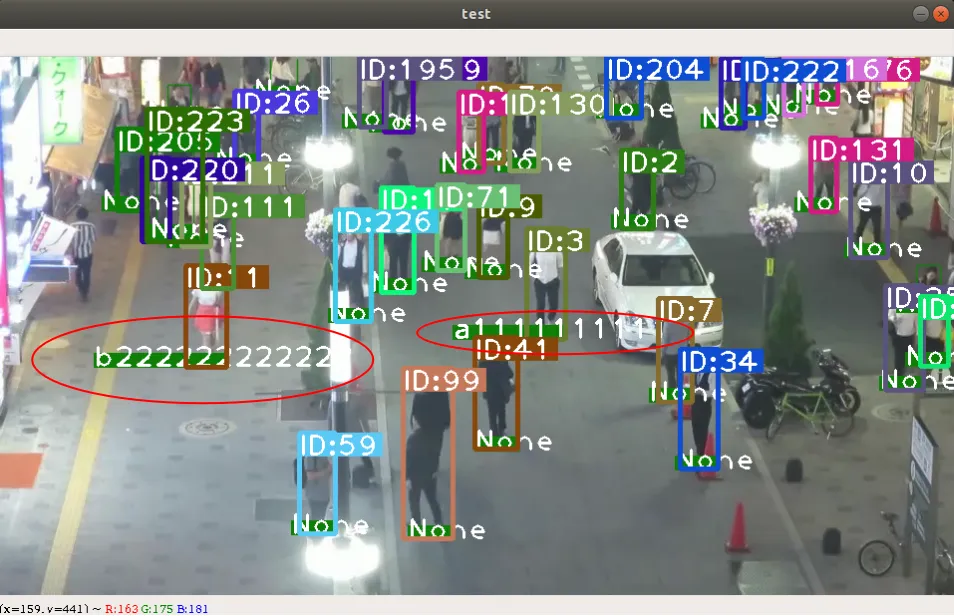
可以看到,由于事先已经提了2位行人( a1111111111 和 b222222222222 )的特征,所以,画面中能够识别出这2个人并进行跟踪。默认,特征文件保存在 fast_reid/query 下
特征提取
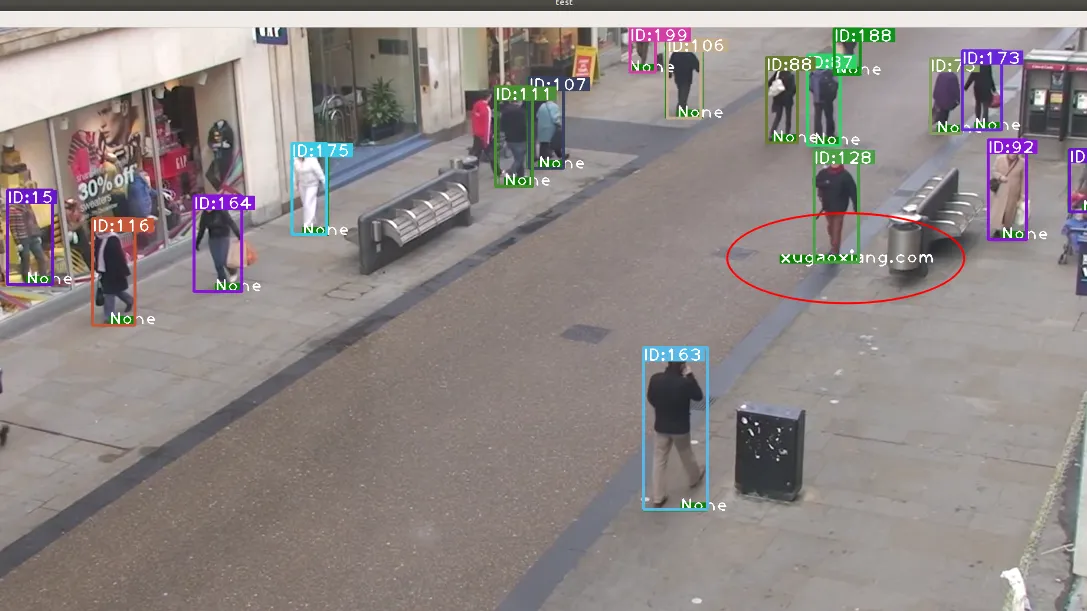
如果你也想要制作一个特征文件,可以按照下面的步骤进行
首先,需要截取目标人物的图片,存放在某个以特定目标命名的文件夹下,如我这里的 xugaoxiang.com,这样,后面进行识别的时候,就显示 xugaoxiang.com 这个名字了。把这个文件夹拷贝到 fast_reid/query 目录下,目录结构如下
(pytorch1.6) xugaoxiang@1070Ti:~/Works/Yolov5-Deepsort-Fastreid/fast_reid/query$ tree
.
├── names.npy
├── query_features.npy
└── xugaoxiang.com
    ├── 10.png
    ├── 11.png
    ├── 12.png
    ├── 13.png
    ├── 14.png
    ├── 15.png
    ├── 1.png
    ├── 2.png
    ├── 3.png
    ├── 4.png
    ├── 5.png
    ├── 6.png
    ├── 7.png
    ├── 8.png
    └── 9.png
接下来执行
cd fast_reid/demo
python person_bank.py执行完毕后,query 目录下的 query_features.npy 和 names.npy 就被更新了
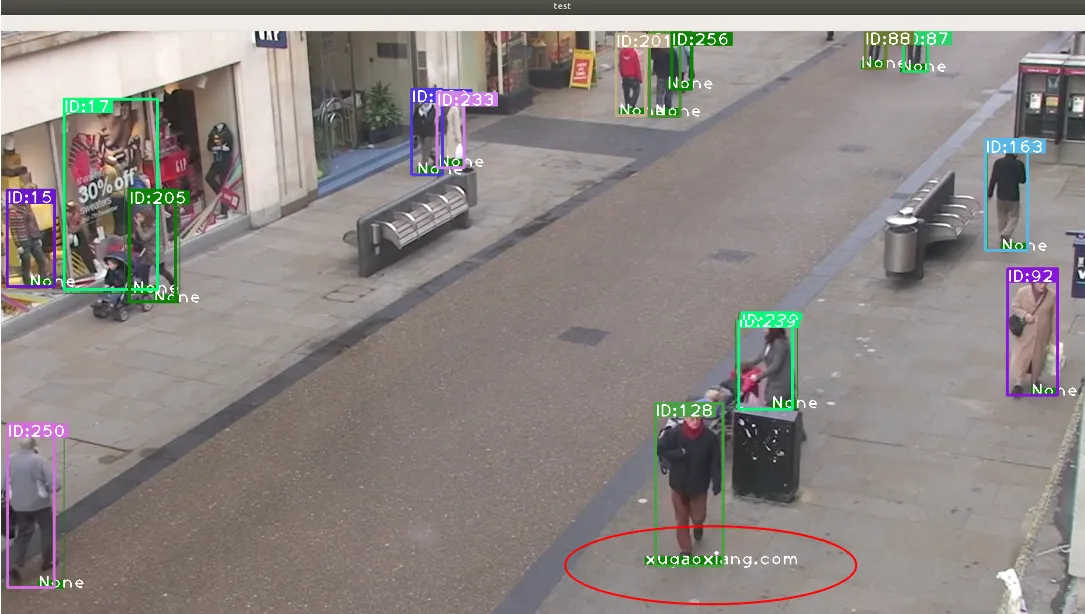
最后,找个包含目标的视频测试下效果
工程下载
最后,将包含所需文件全部打包,需要的朋友自行下载
链接:https://pan.baidu.com/s/1JiFzo5_H7TKniZZPzjZK7A
提取码:nauu