简介
MS COCO 数据集是目标检测领域中另一个非常有名的大型数据集(前面介绍过 PASCAL VOC ),其中 COCO 是 Common Objects in COntext 的缩写,由微软公司构建,其中包含了 detection、segmentation、keypoints 等任务,目前主要的赞助者有 Microsoft、Facebook、Google 等大厂。
与 PASCAL VOC 数据集相比,MS COCO 中的图片数据,目标更多,尺寸更小且图片背景更加复杂,因此,在此数据集上的任务就显得更难。对于现在的检测算法来讲,在 MS COCO 上的检测结果俨然成为了衡量模型好坏的事实标准。
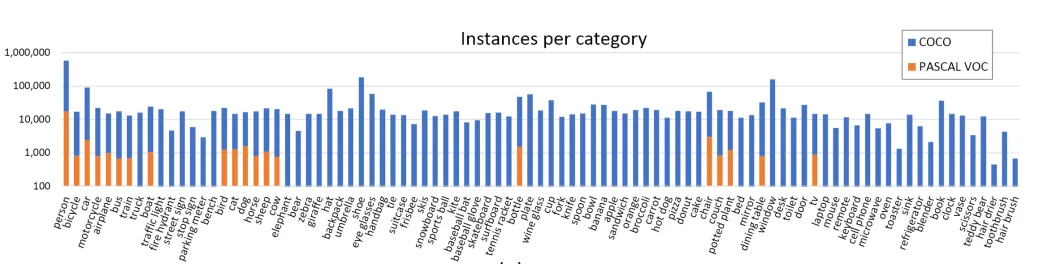
MS COCO 总共包含91个 stuff categories,80个 object cagegories 也就是我们常说的物体类别,下图是与 PASCAL VOC 的一个类别及数据量对比
评估标准
MS COCO 的评估标准比 PASCAL VOC 更加严格,跟 PASCAL VOC 使用 mAP 不同,MS COCO 的主要评价指标是 AP
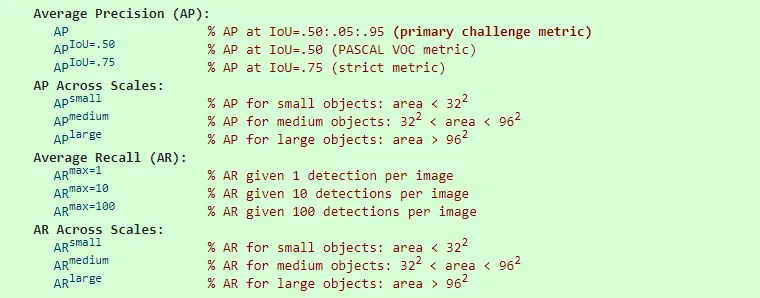
从上图中可以看到:
MS COCO中的AP是在10个IOU(0.5开始,步长0.05,直到0.95) 层面以及80个类别层面的平均值- 针对三种不同大小(
small、medium、large)提出了不同的测量标准 - 除了
AP,还提出了AR即(Average Recall)的评价标准,它的计算方法跟AP是类似的
标注格式
不同于 PASCAL VOC,一张图片对应一个 xml 文件,MS COCO 是直接将所有图片以及对应的 bbox 信息写在了一个 json 文件里。标注的 json 文件是这样的
{
    "info": info,
    "images": [image],
    "annotations": [annotation],
    "licenses": [license],
    "categories": [category]
}

info{
    "year": int,
    "version": str,
    "description": str,
    "contributor": str,
    "url": str,
    "date_created": datetime,
}

image{
    "id": int,
    "width": int,
    "height": int,
    "file_name": str,
    "license": int,
    "flickr_url": str,
    "coco_url": str,
    "date_captured": datetime,
}

license{
    "id": int,
    "name": str,
    "url": str,
}

{
    "id": int,
    "name": str,
    "supercategory": str,
    "keypoints": [str],
    "skeleton": [edge]
}

annotation{
    "id": int,
    "image_id": int,
    "category_id": int,
    "segmentation": RLE or [polygon],
    "area": float,
    "bbox": [x,y,width,height],
    "iscrowd": 0 or 1,
}
这里有几个关键字,解释一下
info:记录数据集的基本信息license:版权信息,也就是图片的出处images:包含每一张图片的信息,主要包括文件名、宽、高、id等categories:类别信息,id编号从1开始,0是背景,还有个supercategory,比如说狗和猫,supercategory就是动物annotations:训练集(或测试集)中bbox的数量
MS COCO 数据集中共有3种标注类型,分别是 object instances、object keypoints 和 image captions,其中,info、licenses 和 images 三种结构是共享的,在不同的 json 文件中这三个类型是一样的,而 annotation 和 category 是不同的
数据集下载
主要有2014和2017两个数据集,2014年的数据用于 Detection 目标检测、Captioning 字幕标注、Keypoints 关键点检测三个任务中,而2017年的数据在此基础之上,多了 Stuff 和 Panoptic 分割任务。
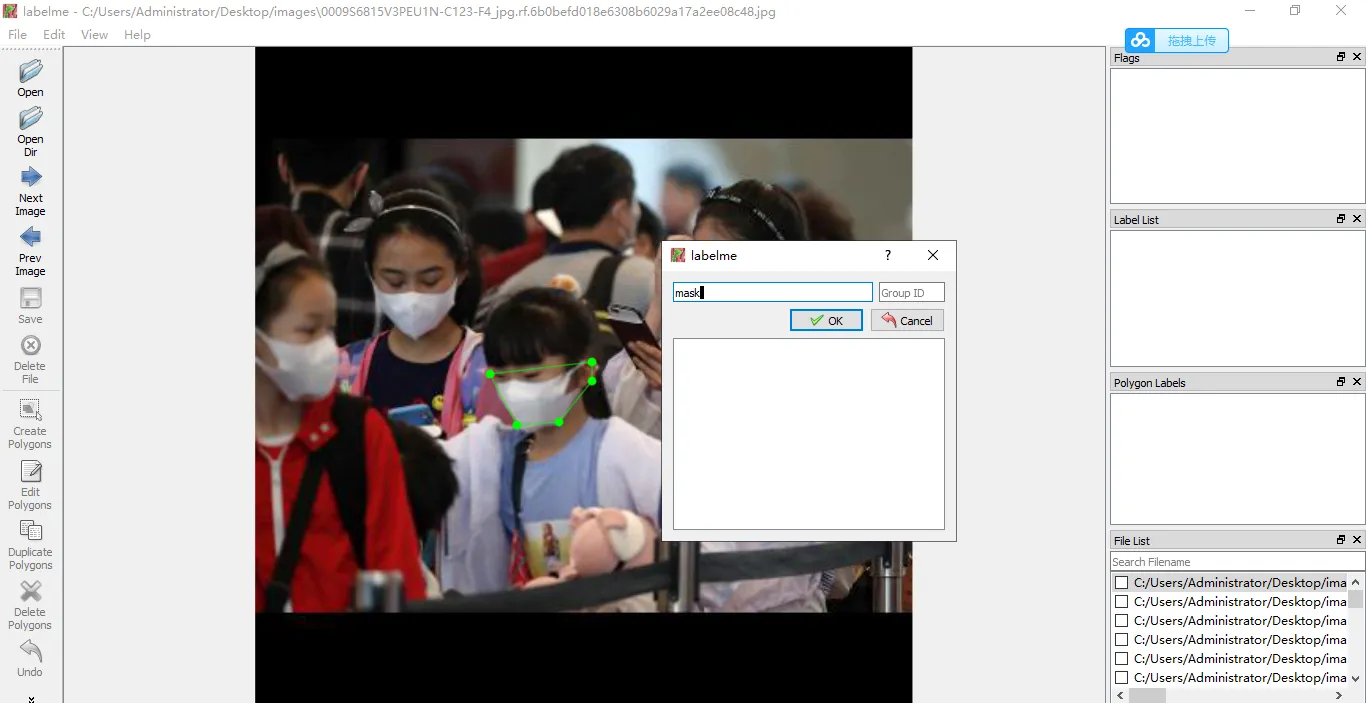
标注工具
推荐 labelme,直接使用 pip install labelme 就可以完成安装。使用方法也很简单,跟 labelImg 差不太多
PASCAL VOC和MS COCO相互转化
可以使用下面这个开源工具 https://github.com/veraposeidon/labelme2Datasets
COCO API
MS COCO 提供了相关的 API,用来进行数据集的操作,地址是: https://github.com/cocodataset/cocoapi,它提供了 Python、Lua 和 Matlib 的接口,这里以 Python 为例
首先是安装
git clone https://github.com/cocodataset/cocoapi.git
cd cocoapi/PythonAPI
make
下面是官方给出的一个使用示例
from pycocotools.coco import COCO
import numpy as np
import skimage.io as io
import matplotlib.pyplot as plt
import pylab
pylab.rcParams['figure.figsize'] = (8.0, 10.0)

dataDir='..'
dataType='val2017'
annFile='{}/annotations/instances_{}.json'.format(dataDir,dataType)
# 通过instance annotations的json文件得到coco对象
coco=COCO(annFile)

cats = coco.loadCats(coco.getCatIds())
nms=[cat['name'] for cat in cats]
# 输出目标类别
print('COCO categories: \n{}\n'.format(' '.join(nms)))

nms = set([cat['supercategory'] for cat in cats])
# 输出大类别,supercategory
print('COCO supercategories: \n{}'.format(' '.join(nms)))

# get all images containing given categories, select one at random
catIds = coco.getCatIds(catNms=['person','dog','skateboard']);
imgIds = coco.getImgIds(catIds=catIds );
imgIds = coco.getImgIds(imgIds = [324158])
# 得到img对象,图片信息都在这里
img = coco.loadImgs(imgIds[np.random.randint(0,len(imgIds))])[0]

# 读取图片并显示出来
# I = io.imread('%s/images/%s/%s'%(dataDir,dataType,img['file_name']))
# use url to load image
I = io.imread(img['coco_url'])
plt.axis('off')
plt.imshow(I)
plt.show()
代码执行后显示