软硬件环境
- ubuntu 18.04 64bit
- anaconda with python 3.6
- setup.py
前言
科技发展到今日,软件开发已经变得越来越复杂,再也不是单单靠一个人的力量就能够完成,在这种背景下,工程化就变得越来越重要,一方面它可以帮助我们规范我们的工程,这里的规范不仅仅是指代码的规范,还有文档,测试等;另一方面也方便了后来者的阅读理解,节省时间及人力成本,比如团队中新员工的加入,或者项目开发者的离职交接,相信在国内的大环境下,这种情况不在少数。
最近在做一个基于人脸识别的考勤系统,本文就在这个项目的基础上,给大家讲讲 python 项目基于 setup.py 的打包及部署。首先给出项目的工程目录结构
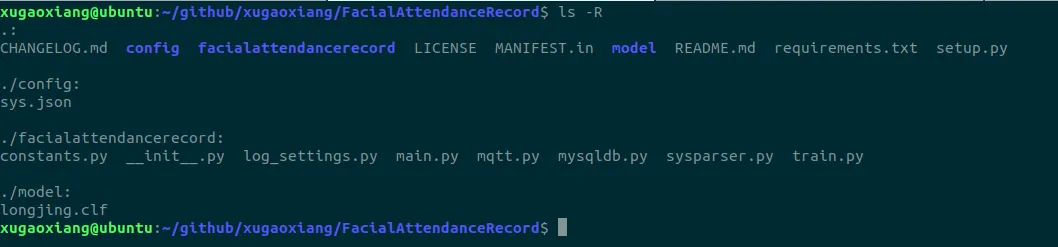
项目本身是一个服务,运行环境是在服务器,因此我需要将它做成一个命令行工具。
setup.py文件简介
玩过 python 的应该都知道这个 setup.py 文件吧,特别是在开源领域。setuptools 是一个优秀的、可靠的 python 包安装与分发工具,而打包分发的关键在于编写 setup.py 文件。 setup.py 文件编写的规则是从setuptools 导入 setup 及其它一些 辅助 模块函数, 并传入各类参数进行调用。
setup.py的使用
setup.py编写好了,接下来就是如何使用它了。setup.py 支持的命令非常多,可以调用 python setup.py --help-commands 进行查看
Standard commands:
  build             build everything needed to install
  build_py          "build" pure Python modules (copy to build directory)
  build_ext         build C/C++ and Cython extensions (compile/link to build directory)
  build_clib        build C/C++ libraries used by Python extensions
  build_scripts     "build" scripts (copy and fixup #! line)
  clean             clean up temporary files from 'build' command
  install           install everything from build directory
  install_lib       install all Python modules (extensions and pure Python)
  install_headers   install C/C++ header files
  install_scripts   install scripts (Python or otherwise)
  install_data      install data files
  sdist             create a source distribution (tarball, zip file, etc.)
  register          register the distribution with the Python package index
  bdist             create a built (binary) distribution
  bdist_dumb        create a "dumb" built distribution
  bdist_rpm         create an RPM distribution
  bdist_wininst     create an executable installer for MS Windows
  check             perform some checks on the package
  upload            upload binary package to PyPI

Extra commands:
  bdist_wheel       create a wheel distribution
  build_sphinx      Build Sphinx documentation
  alias             define a shortcut to invoke one or more commands
  bdist_egg         create an "egg" distribution
  develop           install package in 'development mode'
  easy_install      Find/get/install Python packages
  egg_info          create a distribution's .egg-info directory
  install_egg_info  Install an .egg-info directory for the package
  rotate            delete older distributions, keeping N newest files
  saveopts          save supplied options to setup.cfg or other config file
  setopt            set an option in setup.cfg or another config file
  test              run unit tests after in-place build
  upload_docs       Upload documentation to PyPI
  nosetests         Run unit tests using nosetests
  isort             Run isort on modules registered in setuptools
  compile_catalog   compile message catalogs to binary MO files
  extract_messages  extract localizable strings from the project code
  init_catalog      create a new catalog based on a POT file
  update_catalog    update message catalogs from a POT file
平常我们使用较多的有源码打包和本地安装
python setup.py sdist
python setup.py install
setup.py的编写
还是以人脸识别这个项目为例
# -*- coding: utf-8 -*-
# @time : 18-8-10 下午8:28
# @author : xugaoxiang
# @email : xugx.ai@gmail.com
# @website : https://xugaoxiang.com
# @file : setup.py.py
# @software: PyCharm
# Always prefer setuptools over distutils,导入模块
from setuptools import setup, find_packages
from os import path
# 分别读取README.md和requirements.txt的内容
here = path.abspath(path.dirname(__file__))
# Get the long description from the README file
with open('README.md', encoding='utf-8') as fp:
long_description = fp.read()
with open('requirements.txt', encoding='utf-8') as fp:
install_requires = fp.read()
setup(
# 名称
name='FacialAttendanceRecord',
# 版本号
version='1.0.1',
# 基本描述
description='Facial Attendance Record',
# 项目的详细介绍,我这填充的是README.md的内容
long_description=long_description,
# README的格式,支持markdown,应该算是标准了
long_description_content_type='text/markdown',
# 项目的地址
url='https://xugaoxiang.com',
# 项目的作者
author='xugaoxiang',
# 作者的邮箱地址
author_email='xugx.ai@gmail.com',
# Classifiers,
classifiers=[ # Optional
# How mature is this project? Common values are
# 3 - Alpha
# 4 - Beta
# 5 - Production/Stable
'Development Status :: 3 - Beta',
# Indicate who your project is intended for
'Intended Audience :: Developers',
'Topic :: Software Development :: Build Tools',
# Pick your license as you wish
'License :: OSI Approved :: GNU GPL v3 License',
# Specify the Python versions you support here. In particular, ensure
# that you indicate whether you support Python 2, Python 3 or both.
'Programming Language :: Python :: 3',
'Programming Language :: Python :: 3.4',
'Programming Language :: Python :: 3.5',
'Programming Language :: Python :: 3.6',
],
# 项目的关键字
keywords='facial attendance record',
# 打包时需要加入的模块,调用find_packages方法实现,简单方便
packages=find_packages(exclude=['contrib', 'docs', 'tests', 'build', 'dist']),
# 项目的依赖库,读取的requirements.txt内容
install_requires=install_requires,
# 数据文件都写在了MANIFEST.in文件中
include_package_data=True,
# entry_points 指明了工程的入口,在本项目中就是facialattendancerecord模块下的main.py中的main方法
# 我这是命令行工具,安装成功后就是执行的这个命令
entry_points={
'console_scripts': [
'FacialAttendanceRecord=facialattendancerecord.main:main',
],
},
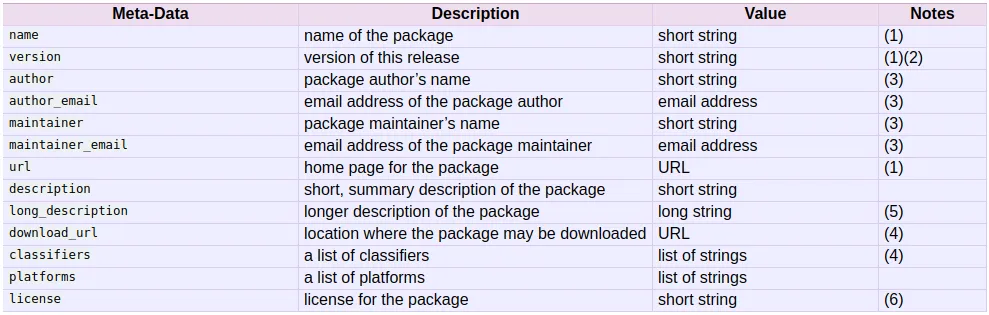
)metadata
metadata其实有很多,下面是一张表
Classifiers
Classifiers可填写的内容也比较多,具体的可以参考这个链接 https://pypi.org/pypi?%3Aaction=list_classifiers
MANIFEST.in
该文件内容就是需要包含在分发包中的文件,示例如下
include README.md
include LICENSE
include MANIFEST.in

recursive-include config *.json

prune build
graft samples其中include和graft是一个意思,区别在于前者是包含文件,后者是针对文件夹,prune是剔除文件夹,recursive-include相当于递归包含
requirements.txt
python 通过提供 requirements.txt 文件来对项目中依赖的第三方库进行整体安装,用户不用手动的一条条去敲 pip install 命令,只需要执行
pip install -r requirements.txt就可以安装项目所需要的所以软件包。requirements.txt 文件的格式一般是这样的
Werkzeug==0.14.1
setuptools==36.4.0
SQLAlchemy_Utils==0.33.3
APScheduler==3.5.1
click==6.7
SQLAlchemy==1.2.1
Flask==0.12.2
Pillow==5.2.0
paho_mqtt==1.3.1
scikit_learn==0.19.2
tornado==5.1
每一行对应一个类库,等号右边的是对应库的版本号。对于稍大型的项目来讲,依赖的第三方库很多,所以,如果能够自动生成这个文件,将大大提升我们的工作效率。幸好有 pipreqs 这个工具,通过 pip 直接安装
pip install pipreqs然后进入到项目目录,执行命令
pipreqs .