软硬件环境
- ubuntu 18.04 64bit
- anaconda3 with python 3.7
- pycharm 2020.1.2
- flask 1.1.2
- gunicorn 20.0.4
- nginx 1.14.0
视频看这里
此处是 youtube 的播放链接,需要科学上网。喜欢我的视频,请记得订阅我的频道,打开旁边的小铃铛,点赞并分享,感谢您的支持。
前言
Flask 框架内部实现了一个简易的 Web 服务器,因此在之前的教程中,我们并没有去单独安装 Web 服务器,但是如果项目要在生产环境中部署的话,其内置的服务器是不适合的,既不够稳定,也无法承受大量请求的并发,Flask+gunicorn+nginx+supervisor 是最常用的 Flask 应用部署方案,本文就来一步一步进行 Flask 应用程序的部署
什么是WSGI
Web Server Gateway Interface,即 web 服务器网关接口,是 Web 服务器和 Web 应用程序或框架之间的一种简单而通用的接口,它是一种协议,一种规范,专门用来解决众多 Web 服务器和 Web 应用程序或框架的兼容性问题。有了 WSGI,你不用担心你写的 Web 应用程序只能运行在某一款 Web 服务器上。
gunicorn
目前 Flask 官方列出了5个常用的 WSGI 容器,它们都实现了 WSGI,我们使用最常用的 gunicorn

它的安装非常方便,使用 pip 即可
pip install gunicorn接下来就可以启动 gunicorn 服务了,我们使用 Flask教程(十)表单处理Flask-WTF 中的示例,进入到源码目录,执行 gunicorn -w 2 -b :5000 run:app
命令中的 -w 指的是处理请求的进程数,-b 是指绑定本机 ip,可以省略掉不写,使用的端口是5000,run:app 指的是 run.py 中的 flask app,更多参数帮助可以参照 gunicorn -h
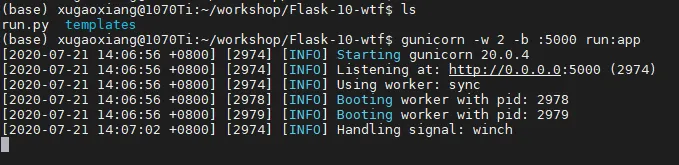
这时候在浏览器中访问 http://192.168.1.140:5000,这里的192.168.1.140是 ubuntu 系统的 ip 地址

效果与 Flask 内置服务器是一模一样的
nginx
nginx 是一个功能强大的反向代理服务器,我们使用 nginx 来转发 gunicorn 服务。为什么要在 gunicorn 之上再加层 nginx 呢?一方面 nginx 可以补充 gunicorn 在某些方面的不足,如 SSL 支持、高并发处理、负载均衡处理等,另一方面如果是做一个 web 网站,除了服务之外,肯定会有一些静态文件需要托管,这方面也是 nginx 的强项
首先安装 nginx
sudo apt install nginx编辑配置文件 /etc/nginx/sites-available/default,修改 location / 如下
# 注意下这里的监听端口,访问的时候会用到
listen 80 default_server;
listen [::]:80 default_server;

location / {
    # First attempt to serve request as file, then
    # as directory, then fall back to displaying a 404.
    try_files $uri $uri/ =404;
    proxy_pass http://localhost:5000/;
    proxy_redirect off;

    proxy_set_header Host $http_post;
    proxy_set_header X-Real-IP $remote_addr;
    proxy_set_header X-Forwarded-For $proxy_add_x_forwarded_for;
}
接下来重启 nginx 服务
sudo /etc/init.d/nginx restart这时候一定要确保 gunicorn 服务已经启动,然后访问 http://192.168.1.140

supervisor
supervisor 是一个用 python 语言编写的进程管理工具,它可以很方便的监听、启动、停止、重启一个或多个进程。当一个进程意外被杀死,supervisor 监听到进程死后,可以很方便的让进程自动恢复,不再需要程序员或系统管理员自己编写代码来控制,更详细的使用方法请参考之前的文章 https://xugaoxiang.com/2019/12/04/supervisor/
首先创建 /etc/supervisor/conf.d/gunicorn.conf 文件,这是 gunicorn 服务的配置文件
[program:gunicorn]
command=/home/xugaoxiang/anaconda3/bin/gunicorn -w 2 -b :5000 run:app
directory=/home/xugaoxiang/workshop/Flask-10-wtf
autostart=true
autorestart=true
user=xugaoxiang
redirect_stderr=true
接着还是同样的方法创建 nginx 的配置文件,/etc/supervisor/conf.d/nginx.conf,内容是
[program:nginx]
command=/usr/sbin/nginx -g 'daemon on;'
autostart=true
autorestart=true
user=root
redirect_stderr=true
nginx 是需要 root 权限的,所以 user 应该设置成 root。最后就可以重启 supervisor 了
sudo /etc/init.d/supervisor restart 重启成功后,我们来查看下 gunicorn 和 nginx 是否启动正常

以及 Flask 应用是否正常
源码下载
https://github.com/xugaoxiang/FlaskTutorial
Flask系列教程
更多 Flask 教程,请移步
https://xugaoxiang.com/category/python/flask/